Setting up smart shutters
Automating our shutters sounded simple. In reality, it meant navigating proprietary ecosystems, expensive hardware, and questionable cloud solutions. Here's how I ended up with a Zigbee and Home Assistant setup that works surprisingly well.
A while ago we bought our first house.
As many houses in Spain (and in a lot of European countries) it came with shutters.
Normally you're supposed to just use a belt to raise and lower them.
Operating them manually isn't the end of the world, but it does become a little annoying after a while.
In addition when being out for a couple of days, the shutters would just stay how you left them.
So people could easily see whether you were home or not. Not particularly secure, I would say.
For these two reasons we decided we wanted smart shutters.
For some reason information about shutters is not so readily available as I had hoped.
I suspect that's because most of the content I consume is in English, and exterior shutters aren't nearly as common in English-speaking countries.
Honestly I didn't need this project to turn into a whole ordeal.
I was more than happy to buy an off-the-shelf solution and call it a day.
However, I had a few requirements (yes, here we go again): I wanted local integration with Home Assistant and physical controls. If there was a cloud component, that was fine, as long as Home Assistant could still control the shutters when the internet connection was unavailable.
The first solution I looked at was Somfy. They're one of the best-known manufacturers of motorized blinds and shutters, so they seemed like an obvious place to start.
They have a smart hub that connects to the cloud.
However, the smart hub uses a proprietary protocol to communicate with their motors and you're only able to gather data from that hub through the cloud.
On top of that, it was expensive. I was quoted around €2,000 for the motors, hub, and switches alone.
I did some further research and found several shutter motors from Chinese manufacturers. These products are sold under a variety of brand names and can be found on popular online marketplaces as well as through some major retailers.
However, the smart functionality is typically based on the Tuya ecosystem, often requiring the use of a vendor-specific app.
The whole setup felt like a security nightmare. It would have required installing an app from a manufacturer I had never heard of and connecting a device from that same vendor to my home Wi‑Fi network.
Since these devices appear to be Tuya-based, I could probably have integrated them with Home Assistant through Tuya Local.
However, that would have been an entire project in its own right, with no guarantee of success.
It was a level of effort and risk I wasn't willing to take.
My next discovery was that they sold some relay modules that were intended to drive shutter motors.
They're a bit difficult to find, but they sell shutter motors that only include power and control wires.
Normally they're intended to be hooked up to a wall switch, but it was perfectly feasible to hook a relay module into it.
However, the installation could be a bit tricky. European wall boxes aren't that deep and fitting a wall switch and a relay module seemed a bit difficult.
Right at that time SONOFF launched their Fusion Series.
It is a whole set of wall switches paired with relay modules.
This article is not sponsored so later on you'll hear my complaints about the product line, but I have to admit it pretty much solved the physical installation part.
The product line includes the SONOFF Fusion Series Orb-ZBRBS which is a wall plate together with a Zigbee module. Pretty much the dream setup.
So I went ahead and bought the smart relays and the shutter motors.
At this point I had seen some videos on the internet, but they were with other products.
It took quite some effort to convince my electrician (who also happens to be my father) that this was a feasible approach. Most shutter installations are just a wall switch connected directly to the motor, so the idea of mixing a motor, a smart relay and a wall plate seemed quite daunting at first.
The installation process isn't that complicated, but it's messy. Here I have a gripe with house builders: is it really that difficult to run a power cable near the windows? Does it really save that much money?
Thanks to that rather questionable design decision, we had to open sections of the ceiling in order to route power cables from the electrical cabinet to each window. Once the wiring was in place, connecting the smart relays to the motors was actually fairly straightforward.
We were lucky because our house uses drywall instead of brick, which is common in many houses here. Dealing with drywall creates enough dust already; I can't imagine how much more disruptive this project would have been with traditional brick walls.
Although the relay itself is a Zigbee device, SONOFF seems very keen on directing customers towards their own application. I had to do a bit of digging online before I found the pairing instructions.
Once paired with Zigbee2MQTT, however, everything worked exactly as I had hoped. The shutters appeared in Home Assistant and from that point on I was free to build whatever automations I wanted.
After a couple of months living with the solution, I've developed a few opinions.
But before I get to the complaints, I should mention that I'm generally very happy with the result. The system works exactly as intended and has been completely reliable.
My first gripe has to do with the physical format SONOFF chose for the Fusion Series. In many ways, they have the perfect product, but for some reason they decided not to follow standard European wall switch dimensions.
I understand why they chose this design. The round button assembly aligns directly with the contact pins on the relay module. If a more traditional square design had been used, there would be a much greater risk of the button not making proper contact with the relay when pressed.
Even so, it would probably have been possible to offer an adapter plate that allows the round Fusion mechanism to be used with standard European wall switch frames.
Doing so would have made the product significantly more flexible and far easier to integrate into existing installations.
If you want to combine a Fusion switch with a traditional light switch in the same frame, you're largely out of luck.
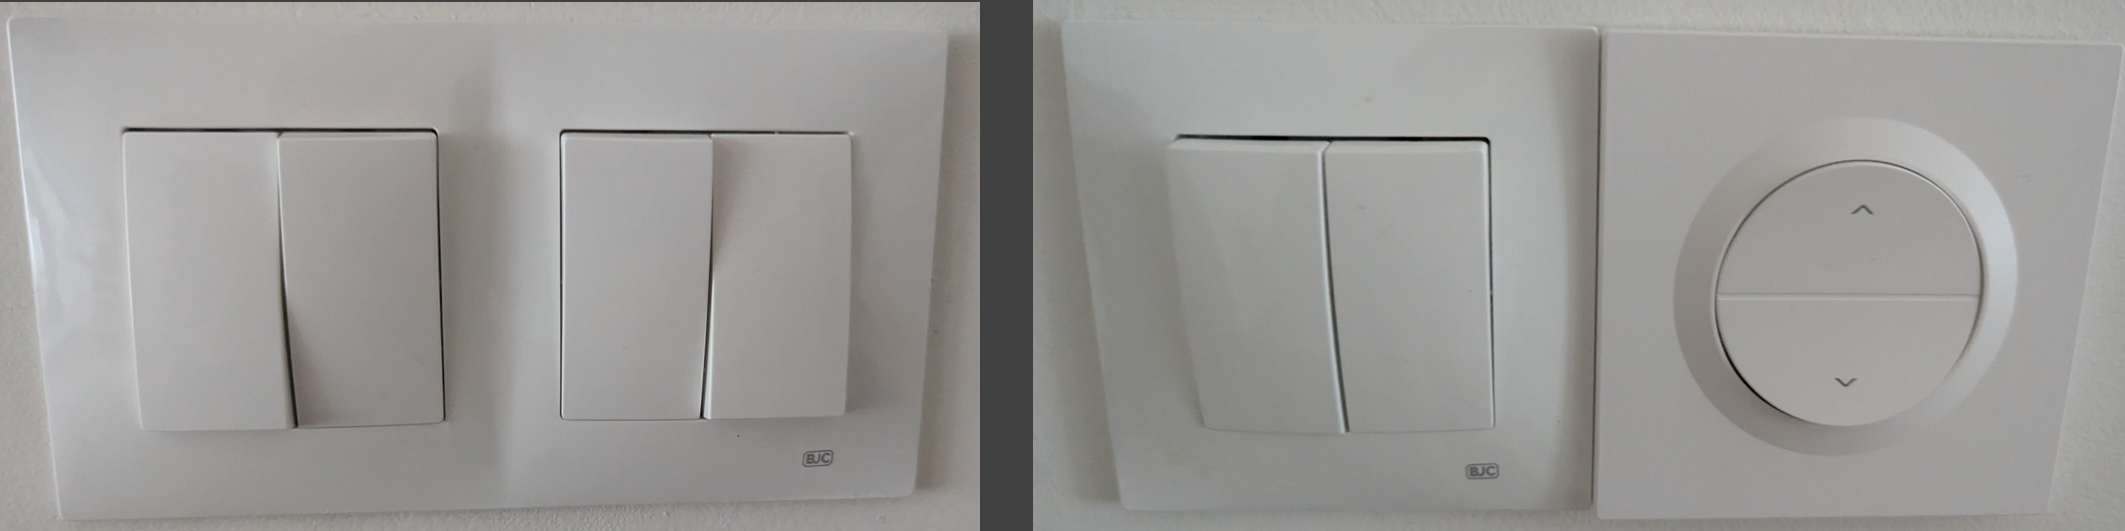
They even provide a list of compatible frames and 3D models on their website. A whole list of manufacturers, a whole list of products... but which one is supposed to be the standard? Your guess is as good as mine.
And is it really that difficult to sell a few frames that let you combine standard wall switches with the Fusion Series?
My second complaint concerns the reported shutter position. According to discussions on the SONOFF forums, I am far from the only person experiencing this problem.
The reported position simply doesn't make sense. Even after performing the calibration procedure multiple times, the values remain inaccurate. For example, setting a shutter to 30% openness often results in something much closer to 60% in reality.
For something that should be a fairly basic feature, it is surprisingly unreliable. Months later, it still hasn't been properly resolved.
My final complaint concerns the physical controls themselves.
While they generally work, they can be surprisingly finicky. More often than I would like, pressing a button doesn't immediately trigger any action and I need to press it a second time before the shutter responds.
Would I choose the same product again?
I'm annoyed to say that I probably would.
For all my complaints, I still haven't found another solution that solves the physical installation problem this well. The hardware is solid, Zigbee2MQTT integration works nicely, and Home Assistant has no trouble controlling the shutters.
You'll just have to accept a few quirks along the way. You'll need to live with double frames and SONOFF's custom switch format, unless SONOFF suddenly decides to embrace standard European wall switch dimensions, of course.
As an added bonus, here's an example of how I ended up automating the shutters in Home Assistant.
alias: Shutter automation
triggers:
  - trigger: sun
    event: sunrise
    offset: 0
  - trigger: time
    at: '08:30:00'
  - trigger: sun
    event: sunset
    offset: '0:10:0'
conditions:
  - condition: or
    conditions:
      - condition: and
        conditions:
          - condition: sun
            after: sunrise
          - condition: time
            after: '08:30:00'
      - condition: sun
        after: sunset
actions:
  - choose:
      - conditions:
          - condition: and
            conditions:
              - condition: sun
                after: sunrise
              - condition: sun
                before: sunset
        sequence:
          - action: cover.open_cover
            metadata: {}
            data: {}
            target:
              entity_id: cover.shutter
      - conditions:
          - condition: sun
            after: sunset
        sequence:
          - action: cover.close_cover
            metadata: {}
            data: {}
            target:
              entity_id: cover.shutter
mode: single
This automation does two simple things.
The shutters will only open after sunrise if it is already past 08:30. During the summer, sunrise can happen surprisingly early, and neither of us enjoys being woken up at six in the morning by a room suddenly filling with sunlight.
In the evening, the shutters close automatically ten minutes after sunset. This provides a bit more privacy, and makes the house appear occupied even when we're away for a couple of days.
I'm quite surprised that figuring this out took me this much work.
I expected to find generic solutions all over the place, but I found mostly expensive and proprietary solutions.
Luckily I've managed to find a solution that just works.