Setup remote acces to your network
You are outside your home, but want to watch your favourite movie on your Plex server, or some VM crashed and you need access to your hypervisor.
In these cases external access to your network comes in handy, in this artivle we will learn how to setup external access with Wireguard.
Assumptions
- You already have a working system with Docker installed
- Your ISP provides an external IP (your internet connection is not behind CG-NAT)
- You know how to expose ports on your firewall
- You already have a domain
Setting up port forwarding
Before you start you should go into your router and forward the port of your liking to the system where later on we will setup Wireguard. It's important that this system has a static ip, since otherwise you would need to update your port forwarding settings each time your ip changes.
 An example of a routing table with port forwarding enabled
Setting up Wireguard
There are different options to setup Wireguard, the option I chose is called wireguard-ui. It is available as an easy to setup Docker image and offers a nice web interface.
This is an example compose file :
    version: "3"
    services:
      wg-ui:
        image: ngoduykhanh/wireguard-ui
        cap_add:
          - NET_ADMIN
          - SYS_MODULE
        environment:
          - WGUI_SERVER_LISTEN_PORT=${WGUI_SERVER_LISTEN_PORT}
          - WGUI_MANAGE_START=true
          - WGUI_MANAGE_RESTART=true
          - WGUI_SERVER_POST_UP_SCRIPT=iptables -A FORWARD -i wg0 -j ACCEPT;iptables -A FORWARD -o wg0 -j ACCEPT;iptables -t nat -A POSTROUTING -o wg0 -j MASQUERADE;iptables -t nat -A POSTROUTING -o eth0 -j MASQUERADE
          - WGUI_SERVER_POST_DOWN_SCRIPT=iptables -D FORWARD -i wg0 -j ACCEPT;iptables -D FORWARD -o wg0 -j ACCEPT;iptables -t nat -D POSTROUTING -o wg0 -j MASQUERADE;iptables -t nat -D POSTROUTING -o eth0 -j MASQUERADE
          - TZ=${TIME_ZONE}
        network_mode: bridge
        volumes:
          - ${WGUI_CONFIG_FOLDER}:/app/db
          - ${WG_CONFIG_FOLDER}:/etc/wireguard

        ports:
          - 5000:5000
          - ${WGUI_SERVER_LISTEN_PORT}:${WGUI_SERVER_LISTEN_PORT}/udp
        sysctls:
           - net.ipv4.conf.all.src_valid_mark=1
           - net.ipv4.ip_forward=1
        restart: unless-stopped
And these are the variables for the compose file
    WGUI_CONFIG_FOLDER=/docker/wireguard/ui
    WG_CONFIG_FOLDER=/docker/wireguard/server
    #this should be the same port you exposed on your router
    WGUI_SERVER_LISTEN_PORT=60
    #choose the timezone you like
    TIME_ZONE=Europe/Madrid
Notices
It's very important you make sure the
WGUI_SERVER_POST_UP_SCRIPTandWGUI_SERVER_POST_DOWN_SCRIPTvariables are correctly filled in. It's not mentioned in the documentation but without them you'll not be able to establish a remote connection.The documentiation suggests using host mode for networking, this might be usefull for performance reasons. However I didnΓÇÖt like to lose network isolation and didn't have performance issues, so I preferred bridge mode.
The documentation mentions that you can setup SMTP to automatically send Wireguard credentials, I've only been able to do this through the SendGrid integration (
SENDGRID_API_KEY)
The next step you should take is to change the default password. You can do this by clicking on the username and then changing the password on the form that appears.
 Change password form
Setting up a domain
This step is not strictly necessary but I very recomendable. Wireguard-ui lets you auto discover your external IP, and this will work.
However most residential internet connections have an dynamic ip address, this means that depending on your ISP your external IP could change at any time without notice. Everytime your external IP changes you would need to go into the settings and discover your new IP address (This could happen every couple of hours, days , months or years).
The issue with this is that your external IP could change without you noticing and at the worst time possible you've lost your remote network access.
The solution to this problem is setting up dynamic DNS. Again there are multiple options to do this, but the solution I liked the most is called ddns-updater.
My compose file looks like this :
    services:
      ddns-updater:
        image: qmcgaw/ddns-updater
        ports:
          - 8000:8000/tcp
        volumes:
          - ${CONFIG_FOLDER}:/updater/data
        environment:
          - CONFIG=
          - PERIOD=5m
          - UPDATE_COOLDOWN_PERIOD=5m
          - PUBLICIP_FETCHERS=all
          - PUBLICIP_HTTP_PROVIDERS=all
          - PUBLICIPV4_HTTP_PROVIDERS=all
          - PUBLICIPV6_HTTP_PROVIDERS=all
          - PUBLICIP_DNS_PROVIDERS=all
          - PUBLICIP_DNS_TIMEOUT=3s
          - HTTP_TIMEOUT=10s
          - LISTENING_PORT=8000
          - ROOT_URL=/
          - BACKUP_PERIOD=0 # 0 to disable
          - BACKUP_DIRECTORY=/updater/data
          - LOG_LEVEL=info
          - LOG_CALLER=hidden
        restart: always
And my variables look like this :
CONFIG_FOLDER=/docker/ddns-updater
The last thing we need to do is to make our config.json file in order to get our dynamic DNS working. This file should be located in your config folder, so in this case in /docker/ddns-updater
This page provides all the available domain registerers and their configuration. Since I use cloudflare my config file looks like this :
    {
      "settings": [
        {
          "provider": "cloudflare",
          // fill in your zone identifier
          "zone_identifier": "zone_identifier",
          // fill in your domain
          "domain": "wireguard.example.com",
          "host": "@",
          "ttl": 600,
          // fill in your token
          "token": "token",
          "ip_version": "ipv4"
        }
      ]
    }
Once you've done this you can verify everything works by opening the web interface at port 8000.
 An example of the web interface
The last step is to fill in our domain in the wireguard settings. You can do this in Global settings > Endpoint address
 Configuring Wireguard end point settings
Setting up clients
The wireguard-ui web interface is simple but for the sake of completeness here is a short explanation on how to create clients.
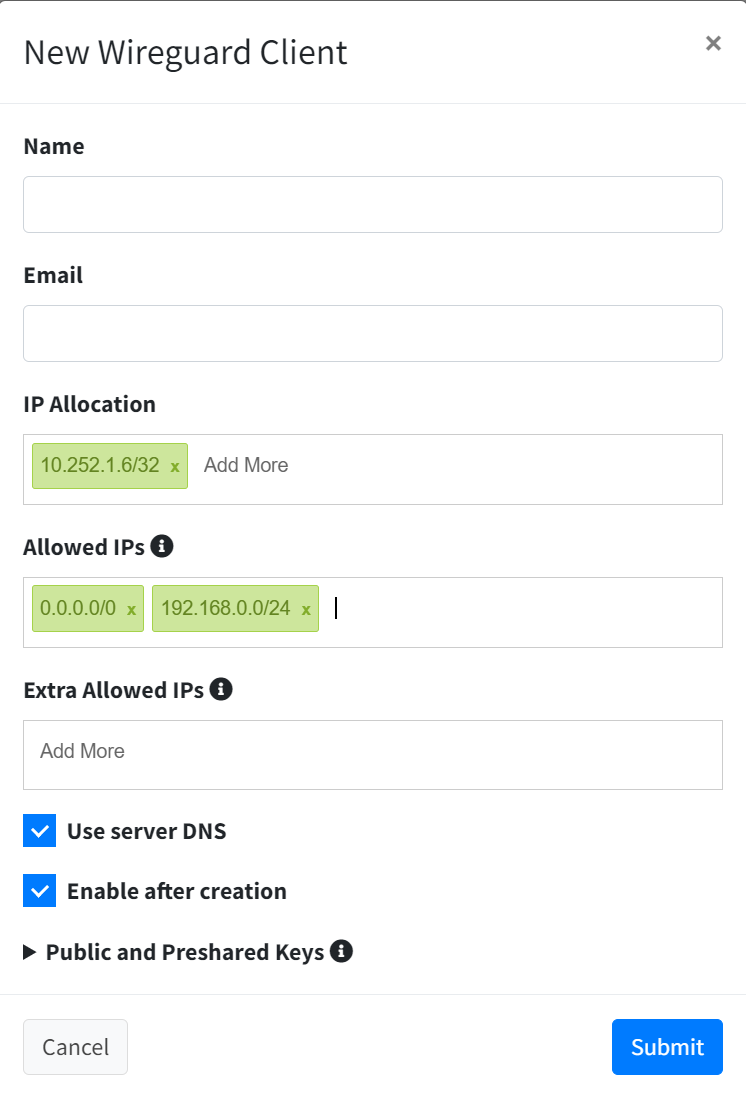
Go to Wireguard Clients and click on the New Client button. You should give it a name and if you want to later on send the wireguard credentials through email you can fill it in. The really important detail is to fill in the network that needs remote access under allowed IP's. Once everything is correctly filled in click on submit.
 New client dialog
The last step would be to go to Wireguard Server and to click on the Apply config button. Now the wireguard server will restart and load the new config. Now you're ready to add as many clients as you want and access your network from remote locations :)